If you are anything like me you have lots of fabric scraps from other projects, or maybe some of those fabrics that were just too cute that you had to buy them and now you have to think of a use for them. It’s one of those addictions that I’m okay with having. It’s right there with chili infused chocolate, whoever created that mixture is a genius!
Okay, back to all those scraps. Hot pads! Perfect for scraps. You can always use hot pads and they make good gifts as well.
To start, gather scraps that look well together and you need to have one that is at least 9” square. The 9” square will become the back and binding for your hot pad.With the scraps (minus the one for the back), cut 5 pieces of fabric that are 9” in length and 3 ½” wide on one side and 1 ½” wide on the other side.
For the padding on the hot pad, you will need to get Insul-Bright batting (made by the same people as warm and natural). It is made to withstand the heat. I like mine a little thicker, so I use two layers. Cut these into 8” squares (oh, by the way, I am making 8” hot pads. I figure it’s a good size). Then cut 2 – 8” squares of Heat-n-Bond Lite.
Iron the Heat-n-Bond squares to one side of each of the Insul-Bright squares.
Then iron the two squares together (make sure that one side of your Heat-n-Bond is on the outside, you’ll need this to attach the fabric).
Place the batting layers in the middle of your fabric back (wrong side of fabric to the Heat-n-Bond side of the batting) then iron them together. This just helps keep everything in place as you sew.
You'll want to iron on the fabric side as well because of the thickness and heat resistance of the batting.Now for the scraps. Place one scrap on the top of the batting, right side up (matching to the side of the batting) and then place a second on top, wrong side up, going the opposite direction and matching the lines. See image if you are now completely confused. You will be “quilting” as you go for this hot pad, so it’s kind of like sewing two fabrics together, right sides facing, on top of more fabric (and batting).
You want to make sure that you always iron the seam flat after sewing each one.
Repeat until you have sewn all 5 fabrics on to the batting.
Trim the sides of your scrap fabrics so that they match the size of the batting. There should just be a little overage on 3 of the sides. Make sure that you don't cut the backing as you trim.
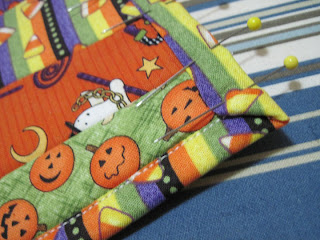
For the binding, I used something really simple. I folded the extra fabric in half so that it touched the batting and ironed it.
Then folded it in half again and ironed it.
This last fold has it covering the hot pad. Pin in place and sew a straight line. Do the 2 opposite sides first then the other 2 sides.
On the corners I folded it so that it would appear to have a mitered corner.


Hi,
ReplyDeleteFollowing you now from Tuesday Tag-a-Long. My blog “Inspire” has inspiring messages about family, faith and other topics. Please follow back!
http://inspiredbyron.blogspot.com/
I am now following you thanks to Tuesday Tag-Along blog hop, and it would be nice if you could share the love back on my blog;)
ReplyDeleteAlso don't forget, if you need any help increasing your blog's traffic or easy blog design tips, you know where to come!
Today we teach another one of our must-know easy blog tutorials, so make sure you don't miss it! Happy Tuesday!
Hi! Great post. I always have so much Halloween fabric left over and don't know what to do with it. Thanks for the tutorial! Saw you on We did it Wednesday! Stop by when you get the chance:
ReplyDeletewww.karismaheartsavannah.blogspot.com
So cute! I love the angled pieces. The fabrics really complement each other. Thanks for sharing!
ReplyDeleteGreat idea. I have a ton of scraps, and nothing to do with them! I'm thinking Christmas hot pads. I'm you newest follower!
ReplyDelete